You are using an out of date browser. It may not display this or other websites correctly.
You should upgrade or use an alternative browser.
You should upgrade or use an alternative browser.
Coronavirus Projects
- Thread starter baugustine
- Start date
- Thread starter
- #123
- May 21, 2016
Yeah, but we've got him stumped with fuel injection !Someone needs to turn this into a meme for @@ducatiman
- Thread starter
- #125
- May 21, 2016
My dad had a 350F for years, green one. Loved that bike, not as cool as the 400 but still a great runner. We called it the “lead sled” because it was heavy with a low center of gravity.
These old things have some weight for sure. Neglected and abused, extensive work ahead. Bike went from owner to owner, leaking carbs the whole time. Needles and seats visibly worn (never replaced?) RTV in lieu of orings in certain places?...scary. My agreed job includes splitting to renew fuel rail orings. Ongoing. Parts to be sourced.
- Jul 5, 2019
So last spring I spent some of the quarantine organizing my tool chest. Getting all my sockets, wrenches and pliers sorted and laid out in their drawers. It turned out great.
Fast forward to this past fall when track days are over, weather is getting colder, and covid started spiking and things started to clamp back down, I figured it best to go ahead and extend that organization streak from the tool chests to the rest of the garage bay. Here's what it looked like around mid-October:

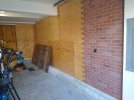
I moved out everything I could, sold a bunch of old tools and donated a bunch of old crap I didn't need, and tore out the drywall. I removed three dead mice carcasses, sealed all the holes and gaps with expanding foam, added some new outlets and a new 20 amp breaker to the panel (since the panel is right there, figured why not), added insulation, and sheathed it with 1/2" plywood. Then I went and covered the plywood with some brick paneling. Here it is about 4 weekends later:
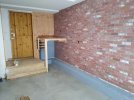
Once the paneling was up, I hit a warm weekend in the 60's and rented a floor buffer with a scrubbing pad and cleaned the garage floors. I etched the concrete and put down a cheap sealant from Home Depot. If I had known ahead of time the weather would be so cooperative, I would have splurged and ordered a better product from one of the online garage shops, but the cheap stuff still keeps the dust down and makes things a little easier to clean. My girls got some sponges and helped paint the brick to add some color, and I built a 3'x4' workbench in the back corner that also provides space for storing my saws and my wood/home tools:
I had a bunch of old tools that belonged to my granddad, and I always wanted to diaplay them in the garage, so I spent an entire weekend with a wire brush and multiple salt/vinegar baths to clean them all. Most of the tool brands on them don't exist any more, and I enjoy the history of them. They are now hung in on the wall with my other wood/home tools stored in the cabinet and drawers. The saws fit under the workbench with my saw horses and some other stuff. I made a flat dolly for the table saw, so it just rolls in and out from the workbench whenever I need it.
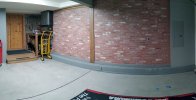
Finished garage with trim and final coat of paint on the walls and ceiling:
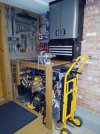
I've since added new lighting and started hanging stuff on the wall. I moved my tool chest over to the garage and am using a 77" wide shelving unit to make it a freestanding workstation. I am mounting some wall control steel pegboard panels to it this weekend, and will start designing some overhead cabinets to build for the top of the shelving unit.
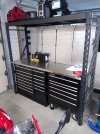
There's obviously a lot of space now for just motorcycle, but this was all designed so I could also fit my SUV in this garage bay without issue. Hence the unique workbench setup in the back corner and mounting things on the wall as much as possible. With nothing stored in the central area of the garage bay, I can move my bike to the back of the garage and also pull in the SUV or the minivan to work on them, or keep them parked inside during the winter.
I'll post up a pic whenever I finish my workstation and cabinets.
Fast forward to this past fall when track days are over, weather is getting colder, and covid started spiking and things started to clamp back down, I figured it best to go ahead and extend that organization streak from the tool chests to the rest of the garage bay. Here's what it looked like around mid-October:

I moved out everything I could, sold a bunch of old tools and donated a bunch of old crap I didn't need, and tore out the drywall. I removed three dead mice carcasses, sealed all the holes and gaps with expanding foam, added some new outlets and a new 20 amp breaker to the panel (since the panel is right there, figured why not), added insulation, and sheathed it with 1/2" plywood. Then I went and covered the plywood with some brick paneling. Here it is about 4 weekends later:

Once the paneling was up, I hit a warm weekend in the 60's and rented a floor buffer with a scrubbing pad and cleaned the garage floors. I etched the concrete and put down a cheap sealant from Home Depot. If I had known ahead of time the weather would be so cooperative, I would have splurged and ordered a better product from one of the online garage shops, but the cheap stuff still keeps the dust down and makes things a little easier to clean. My girls got some sponges and helped paint the brick to add some color, and I built a 3'x4' workbench in the back corner that also provides space for storing my saws and my wood/home tools:

I had a bunch of old tools that belonged to my granddad, and I always wanted to diaplay them in the garage, so I spent an entire weekend with a wire brush and multiple salt/vinegar baths to clean them all. Most of the tool brands on them don't exist any more, and I enjoy the history of them. They are now hung in on the wall with my other wood/home tools stored in the cabinet and drawers. The saws fit under the workbench with my saw horses and some other stuff. I made a flat dolly for the table saw, so it just rolls in and out from the workbench whenever I need it.

Finished garage with trim and final coat of paint on the walls and ceiling:

I've since added new lighting and started hanging stuff on the wall. I moved my tool chest over to the garage and am using a 77" wide shelving unit to make it a freestanding workstation. I am mounting some wall control steel pegboard panels to it this weekend, and will start designing some overhead cabinets to build for the top of the shelving unit.

There's obviously a lot of space now for just motorcycle, but this was all designed so I could also fit my SUV in this garage bay without issue. Hence the unique workbench setup in the back corner and mounting things on the wall as much as possible. With nothing stored in the central area of the garage bay, I can move my bike to the back of the garage and also pull in the SUV or the minivan to work on them, or keep them parked inside during the winter.
I'll post up a pic whenever I finish my workstation and cabinets.
- Thread starter
- #134
- May 21, 2016
Harbor Freight Tools – Quality Tools at Discount Prices Since 1977
Harbor Freight buys their top quality tools from the same factories that supply our competitors. We cut out the middleman and pass the savings to you!
- Jul 29, 2020
- Riding Since
- 2010
the workspace looks great and probably much warmer!
- Apr 26, 2020
- Riding Since
- 1974
That place is too neat - how the hell do you get anything done?!,
I was just piddling around in my garage today and needed my impact driver, which I hadn’t used in many, many years. During the search I uncovered tools I forgot I had, and some other crap that I don’t even know what it is, never mind what o had it for. All I could think was, this area desperately needs to be gone through and sorted out. And then I see this workshop that’s cleaner than most kitchens. Thanks a lot.
I was just piddling around in my garage today and needed my impact driver, which I hadn’t used in many, many years. During the search I uncovered tools I forgot I had, and some other crap that I don’t even know what it is, never mind what o had it for. All I could think was, this area desperately needs to be gone through and sorted out. And then I see this workshop that’s cleaner than most kitchens. Thanks a lot.
- Jul 5, 2019
At least I didn't post pics of my OCD tool cabinet organization, lol.That place is too neat - how the hell do you get anything done?!,
I was just piddling around in my garage today and needed my impact driver, which I hadn’t used in many, many years. During the search I uncovered tools I forgot I had, and some other crap that I don’t even know what it is, never mind what o had it for. All I could think was, this area desperately needs to be gone through and sorted out. And then I see this workshop that’s cleaner than most kitchens. Thanks a lot.
- May 13, 2018
Amazing bench and peg board. Looking for something similar. Is that sold as one or something you put together?
How long before that garage is full of stuff again ?! I put in beams and extra joists and boarded out the loft of my single garage for extra storage and now the ground and first floors are nearly full !So last spring I spent some of the quarantine organizing my tool chest. Getting all my sockets, wrenches and pliers sorted and laid out in their drawers. It turned out great.
Fast forward to this past fall when track days are over, weather is getting colder, and covid started spiking and things started to clamp back down, I figured it best to go ahead and extend that organization streak from the tool chests to the rest of the garage bay. Here's what it looked like around mid-October:
View attachment 9763
I moved out everything I could, sold a bunch of old tools and donated a bunch of old crap I didn't need, and tore out the drywall. I removed three dead mice carcasses, sealed all the holes and gaps with expanding foam, added some new outlets and a new 20 amp breaker to the panel (since the panel is right there, figured why not), added insulation, and sheathed it with 1/2" plywood. Then I went and covered the plywood with some brick paneling. Here it is about 4 weekends later:
View attachment 9764
Once the paneling was up, I hit a warm weekend in the 60's and rented a floor buffer with a scrubbing pad and cleaned the garage floors. I etched the concrete and put down a cheap sealant from Home Depot. If I had known ahead of time the weather would be so cooperative, I would have splurged and ordered a better product from one of the online garage shops, but the cheap stuff still keeps the dust down and makes things a little easier to clean. My girls got some sponges and helped paint the brick to add some color, and I built a 3'x4' workbench in the back corner that also provides space for storing my saws and my wood/home tools:
View attachment 9765
I had a bunch of old tools that belonged to my granddad, and I always wanted to diaplay them in the garage, so I spent an entire weekend with a wire brush and multiple salt/vinegar baths to clean them all. Most of the tool brands on them don't exist any more, and I enjoy the history of them. They are now hung in on the wall with my other wood/home tools stored in the cabinet and drawers. The saws fit under the workbench with my saw horses and some other stuff. I made a flat dolly for the table saw, so it just rolls in and out from the workbench whenever I need it.
View attachment 9766
Finished garage with trim and final coat of paint on the walls and ceiling:
View attachment 9767
I've since added new lighting and started hanging stuff on the wall. I moved my tool chest over to the garage and am using a 77" wide shelving unit to make it a freestanding workstation. I am mounting some wall control steel pegboard panels to it this weekend, and will start designing some overhead cabinets to build for the top of the shelving unit.
View attachment 9768
There's obviously a lot of space now for just motorcycle, but this was all designed so I could also fit my SUV in this garage bay without issue. Hence the unique workbench setup in the back corner and mounting things on the wall as much as possible. With nothing stored in the central area of the garage bay, I can move my bike to the back of the garage and also pull in the SUV or the minivan to work on them, or keep them parked inside during the winter.
I'll post up a pic whenever I finish my workstation and cabinets.
- Jul 5, 2019
Thanks! Yeah, I have a feeling I'll eventually end up re-doing the floor as the cheap sealer is already wearing away.@Dankotaru looks amazing. I recommend a two part epoxy for your floor. Durable and easy clean up for oil and chemical spills. Obviously costs more than the cheap gray sealer but will save you from pealing and having to recoat every year.
Amazing bench and peg board. Looking for something similar. Is that sold as one or something you put together?
The work station is something I've pieced together. The tool chests are 40" and 26" wide Craftsman ball bearing units, bought about 20 years ago. The workbench is 72" x 24" and almost as old as the chests. I typically have the work bench on top of the chests and mounted against the back wall of the garage, but in this case, that wouldn't work because the rear of this garage bay has a utility closet and a door to the back yard. I could mount the workbench to the side wall, but it sticks out too far to also allow me to pull a car in the garage bay. So, the only real option was to put the tool chests and work surface in between the garage bays. Of course, that means no wall to mount it to, no wall for pegboard, cabinets, etc... So, I put up a 77" wide shelving unit and placed the tool chests and work surface in between the shelving posts to create a free-standing work station that can provide a backsplash/pegpoard and overhead storage.
The shelving unit is made by Edsal, and can be found in just about any big box store or Amazon. Here is a link to what I bought:
https://www.menards.com/main/storag...shelving-unit/bw2472w4blk/p-1533623306082.htm
Edsal makes the same unit for Home Depot marketed under the Husky brand, they also make it for DeWalt, and Gladiator. They are all 77" wide, and exactly 72" between the end posts. Mine is the plain black, but because they make the same unit for other brands, you can find it in red, yellow, silver, etc.. depending on the brand you buy.
There are a number of accessories designed for Edsal shelving units. I've seen tool holders, side racks, etc.. all designed to use the Edsal mounts. DeWalt even has steel pegboard that will mount right up to the 77" wide units:
https://dewaltshelving.com/xl-storage-rack-pegboard-kit
I opted to make my own setup using wall control, because they're burly and the slotted design is much sturdier than the round peg holes. I bought four of them from Amazon in the plain galvanized finish, but they can be purchased in a variety of colors:
Amazon product
I ripped three 1x3 pine boards so they were 2 3/8" wide, and inserted them in the shelf rails:
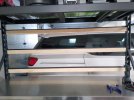
Each rail end has a hole designed for a plastic clip that connnects to the side legs, but I opted to bolt the rail to the side legs for added stability. Then I screwed the boards into the rail using the holes meant for the shelf cross-braces. You can see the side bolt and the hole for the screw in this pic:
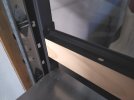
I used 3" #10 screws designed for kitchen cabinets and went right through the wood from the top to the bottom of the rail, 3 screws per rail, and then screwed the pegboard into the wood. It's absolutely solid, no wiggle, and will easily hold whatever I decide to mount on the board:
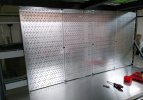
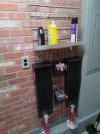
Since I'm not using the other three shelves that come with the unit, I've taken the 4" wire rack that usually spans the shelf rails and mounted it to the wall. It serves as a nice little wire mesh I can clip and hang tools on. What's nice is that I can move stuff around on the wall without having to drill and hang hooks on the wall in different places. Instead, I just put some carabiners or eye bolts on things that I want to hang on the wall and then clip it to the wire rack wherever I want. Here are my ramps and wheel chocks hanging on it, plus a little aluminum shelf I made to hold oil bottles, filter, whatever:
I plan to bolt the other two racks to the sides of the shelving unit, so I can clip and hang air tools on the sides of the work station. So far, I'm happy with how well the shelving unit has worked to create a free standing work station, but I still have to figure out the top storage cabinets. Once I get the top cabinets built, I'll post up how well that works.


